There is a new fashionable trend to decorate the interior and exterior of living spaces with plastic coatings to appease those who like bright and unusual accessories. This idea suits people who can’t get their mothers into the kennels of a small room or grow up, or keep an eye on them. And, it’s crazy, this method of stagnation of vikoryst plastic drink containers is a shock to the soul of everyone who is not in need of the health of the planet, since the wines quickly speed up a lot of everyday smitten, which does not unfold, wilts brown meters in It also acquires a decorative function at the same time. How to make fruits from plastic balls with your own hands, just for the cobs and what kind of stinks there are?
What can you decorate?
Such unique embellishments of the leather are not lacking in durability, but also in their unique versatility, the pieces of leather must be made entirely by hand. They decorate living rooms, kitchens, living rooms and offices, apartment walkways and hallways, office spaces.
They decorate worktops and kitchen tables, as well as any kind of horizontal surfaces. The stench creates the appearance of freshness and naturalness, unless you water them, wash the water, wash the vase, or wipe them with a saw every hour. And those who are in need.

Using such accessible and pliable material as plastic balls, it is not necessary to make flowers on the theme of indoor plants instead of flowers, but to decorate them with the image of home plants. This is a good choice for those who love greenery in their interiors, otherwise they cannot afford natural living plants. Significant reasons may be the presence of domestic animals in the cabin, the presence of allergies, the lack of attention or irresponsible work.

Not only the living ones, but also the masters of plastic pots can decorate the garden of the rainbow garden. Tim no longer takes the time to plant, weed and water the flower beds with live weeds.


And you can also create large-scale decorations - flower trees and other tall flowering plants. For example, if everyday life is carried out on a land plot, it is more likely that if you have pulled yourself up a little, you can organically embellish the look by distributing the succulent bushes.

How to do it
Such containers have gained great popularity and wide popularity not only because they help decorate the interior and exterior spaces of the home, but also eliminate the purchase of empty plastic containers. On the right, there is a great niche for creative and careful people, where they can show their imagination in a new way.
From the dances, elements of the required size are created, which provide the residual form of the melting process. The heat can come from half a candle, a igniter, or a hair dryer. Plastic, as a material, is very pliable, so you just have to press it into realistic shapes - under the infusion of heat and forceps, the veins easily curl and bend. For maximum similarity to the original lengths, the pieces are prepared with special markers or markers. And then, around the parts, they are glued together using additional glue or stringers (called metal ones).

- Before you begin to fold the plastic flap, carefully press it in the middle, clean off the labels, wrinkle the glue, and then wipe dry with a cloth or towel.
- If you need to cut out a lot of new elements, it’s better to make a design from cardboard, and then simply trace it with an awl or a needle around the edges.
- In order to give the required shape to the workpieces, it is best to use tongs and half a candle. Such plastic softens and softens quickly, which makes it possible to carry out various manipulations when molding a part.
- The part can be painted in the main color until it is shaped and melted; and then you can add dotted strokes.
Yak pofarbuvati plastic
- The best option is colored acrylic varnish.
- Acrylic fabrics also look good on PET varnishes, but for durability they are covered with clear acrylic varnish.
- Great flowers for the garden can be sprayed with a spray can (for example, a car spray).
- Enamel stained glass panels will also be installed.
Nizhna Troyanda
You will need: 2 PET-dances - green or some other color, material, candle, tongs, awl, knives.

- It is necessary to make 7 squares of sizes, proportional to the blanks in the image, according to the required size of the current flower from a plate of a sufficient color (for example, blue).
- Using scissors, cut out four pelvic cells from the skin square.
- Using an awl, open the center of the flowers.
- Rub the skins from them over the half of the candle - the plastic will begin to bend, and in the process you can press into the required shape using metal tongs.
- From the green container you will find a kvitkolozh, as well as a chotiriliste (“tooth”).
- Bend it over the half of the hole and make an opening in the middle with an awl.
- Cut a part of the dance (depending on the selected size of the accessory you are preparing) into a stake, forming a spiral shape about 5 mm wide.
- Heat over the candle and with your hands overlap the melted plastic onto the draught; remove approximately 1 cm of “unfavorable”.
- On the other side, place the flower beds and elements in the shape of the flowers, starting from a larger size to a smaller one.
- Using your fingers or tongs, bend the part of the dart that is missing to fix the structure.
- Make a blank for the stem from green plastic.
- Above the half-holes, twist the stems in a spiral, and bend the leaves a little.
- Attach the removed leaf from the main stem, melting the place of the attached part.
Polova chamomile
You will need: 3 plastic balls, ideally in a white, yellow or green color (so as not to over-mix), scissors, a tool or an awl, a candle, tongs, superglue gel.

- Take 2 stakes of the same diameter from a white container.
- Make 4 cuts so that equal parts come out.
- Make 3 incisions in each of them.
- Round off the petals, carefully cutting the rolls.
- Rub the crumbs on a candle until the edges of the pellets bend slightly.
- From the same container there are two hearts.
- Also bend the little bits under the half holes.
- From the green patch, make a circle around the appearance of a 6-pointed star.
- Move the end over the candle.
- Cut a long green paste 4-5 mm wide into a spiral and roll it hotly around the cut so that no loose pieces are lost. Remove approximately 1-1.5 cm in order to place a layer of cabbage on it. For this purpose, the end of the dart can be roasted on fire or pierced with a knife/awl to open the opening in the center.
- Place two white pieces on top.
- Plant the core, bend the drith, which is lost.
- Glue another core onto the top.
- Remove leaves from green plastic.
- Bend over half holes.
- The stem, heated, twist into a spiral.
- Glue and solder the removed sheet to the stem of the flower.
At the end
If you have a bunch of PET-dances in your house for drinking, washing dishes, shampoo or something else, don’t rush to wake it up. We are more interested in the fact that not all residential areas yet have specialized containers for storing plastic containers. Creating flowers from plastic balls will not take much of an hour, and using the instructions, step by step, on how to make them with your own hands, will help you quickly learn how to make garden decor on your own.
Many garden plots create a variety of flowers from plastic balls to beautify the place of their visit. You can create amazing works of magic by spending a minimum amount of money.
It's not just decorative items that need plastic, but also furniture. All you need is just a little bit of imagination.

In this article, we will briefly discuss how to make eggs from plastic balls with your own hands.

Decorating the plot
You won’t see too many self-producing viruses in garden plots. Flowers, creatures, and trees are destroyed. You can create wonderful sculptural compositions that will not only beautify the garden, but also give a wonderful mood.
Let's look at a couple of instructions for beginners to help you easily make mushrooms from plastic balls. There will be a palm tree and a piglet.

Palma with dances
To prepare a palm tree, it is necessary to create a frame. This day it is necessary to increase the height of the tree.

Take bowls of the same size, cut out their bottoms and place them one on top of the other. Then the leaves appear. They are attached to the top of the constructed structure. When everything is ready, prepare the palm tree with green colors.

The funniest pig of dancing
The piglet will look wonderful in any garden. For this preparation you will need:
- dance for 5 l;
- rub the necks out of the dances to prepare the legs;
- one upper part is like a dance, which is cut into two parts to form a ear;
- drit for the tail;
- two truths for the eyes;
- glue;
- rye color
The parts are joined and secured with glue. The prepared virib must be prepared. You can take oline or aerosol farb. To prevent the piglet from being blown away by the wind, it is necessary to soak in the new sand.

In addition to its decorative function, the design can be used as a flower bed. For this purpose the top is cut off, the soil is filled with earth and the leaves are planted.

Plants from plastic garden trays can perform the functions of flower beds, borders or paths. To prepare the track, insert the dances into the ground with their necks.

Vikorist is used as a whole and cut plastic. It is important to fill the dances with earth so that the stench does not deform if it is walked on.

Zastosuvannaya dances in the state
Vikorist dances are not enough to embellish. You can use them to make a scoop, a sink, or a paste for a snack.
Of course, everyone needs storage space to store any items. To prepare it, just cut the neck.

It’s also easy to make a sink with your own hands. The bottom of the dance is cut, and the opening is shaking, like a skein being stretched. Place the structure at the required place and pour water. To soak in, add a few minutes and screw the cap.

To prepare the paste, you need to cut the container halfway. To catch comas, bait is placed on the bottom. For example, pulp syrup with yeast is suitable for this.

You will need hot water to dissolve the yeast and yeast. Once the juice has reached, it is necessary to pour it into the paste. It’s not just flies and wasps that are angry at this lasso, but mosquitoes.
Increase your respect!

You can get a scoop from a child. You first need to outline its shape, and then cut it out.

Plastic can be used to make pots for plants, greenhouses or containers for plantings. A description of such viruses from plastic balls can be found on the Internet at a great distance, but to create something unique, you need to show your imagination.

It is fashionable to use automatic watering in plastic containers. To do this, cut the flap, open the openings on the sides and insert the hose into your neck. For the additional help of such an extension, the growth of the miraculous will begin.
For plants that do not like surface watering, use such a device. In plastic containers, the bottom is not cut completely. On the side of the growth there is a trench where the stones are placed. Bury the dance with the neck down.

Then pour the required amount of water to start watering. You can place the dances up high with the throat, but in this case you will need to open the container.

Use plastic containers to heat the roses. For this dance, fill it with warm water and place it near the plants.
Increase your respect!


To learn more, you can look at various photos of viruses from plastic balls. You don’t need to put in a lot of effort to prepare an original decoration for your garden that will last for a long time.

Photos of viruses from plastic balls


Increase your respect!


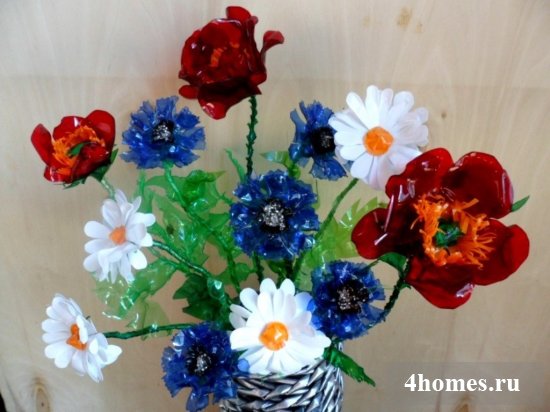
I am sure that after this article you will notice the plastic dances not as much as the smitt, but as the dzherelo strain! Tulips, poppies, Trojans, orchids. And everything is still being stored in PET containers. Let’s take a look at how the flowers look and transform the jars into wonderful decor!
I have selected models that are as simple as possible so that I can start working on them. It will be wonderful if you don’t just quickly use these tips to decorate your door and garden, and also send photos of your work! I’m delighted, you’ve got everything right, and the decor from plastic dances has a lot of fates in mind for you and your family and friends, what a talented person you are!
Do-it-yourself flowers made from plastic dances - a master class for beginners
These table models are so charmingly beautiful that they seem impossible to repeat! Actually, everything is really simple. And I will show you a simple diagram of these original colors.
We cut the bottom of three two-liter dances. We see from the bottom the volumetric parts that are bent at the top (they are near the bottom).
The shape of the parts is similar to that of a speck.

The “speckles” have rounded ends. Carefully make a cut in the middle of the top line, so that the shape of the heart comes out. This is the pellust of the Trojans!
All edges of the pellet are trimmed over the flame of the candle. The stench disappears and emerges in a believable form, like a Trojan. It is not carried to the top half of the earth, but below, where the temperature is lower.

We take one of the pellets. Let's add it all up. And then the skin from the sides is folded to the middle line - a tube emerges, the basis for the bud.

Glue the pellets until they are ready.

And so we cover the middle with pellets from three sides. We glue them with their “backs”, curved sides.

The advancing row of pellets is glued with the turning side.

And the remaining row is glued back again. So we finished cooking and cooking.

The edges of the pellets can be minced in small quantities in any case. So, Trojan, stop being a seer. There will be forms and duties!

Once you remove the neon effect glue, apply it to the edges of the card so that it glows in the dark.
 Do-it-yourself flowers made from plastic dances - a master class for beginners. Author https://www.youtube.com/watch?v=-7EPwoiMhtE
 How to make flowers from plastic dances with your own hands for the garden and city
I wanted to show you how to make a flower from leaves for the garden. This is in between calla and dieffenbachia: large leaves on thin stems. It looks both scary and exciting.
We cut off the top and bottom of 2-3 green spots. We cut the “pipe” completely. This is how we remove the “canvas”.

The canvas is cut into rectangles. The straight cutlets are completely folded.
From the cutaneous orthocutaneous weed we see a leaf on a long stem.

The leaf and stem are approximately equal in age. The leaf shape is similar to a speckled heart.

Wrap another 3 pieces, but they will be narrow, no more than 1cm of edge. One of the workpieces needs to be twisted with a rope.

We seal all the blanks from the can in order to eliminate more color intensities. We begin to assemble the structure.
The workpiece and 2 thin leaves are rolled up in the middle. We tie them tightly with a green tape-stitch.

Place the leaves around the middle and tie them with a stitch.
Once all the leaves have been tied around the middle, we bend them down so that the design becomes more colorful.

Roztashova is putting it into a pot with polystyrene foam. The top of the polystyrene foam is masked with green fabric.
It’s impossible to know the place in this “quote”.
 How to make flowers from plastic balls with your own hands for the garden. Author https://www.youtube.com/watch?v=UaTciCNerQg
 New ideas for gardens and cities with dances + schemes
This ticket can brighten up the bets and the territory of the game. What if there is no bet? Yogo is easy to create! You can plant little chips on the concrete like plastic balls, prepared in black color!
Let's cut the dance all the way through. That part, the neck, is cut into 8 slices.

We bend the darkening by 90⁰.
The edge of the skin is almost similar to a leaf that cuts through the skin.

The edge of the other part of the dance is cut with sharp, shallow (2.5-3 cm) teeth.

We see the day in one more dance. And it’s timid that there are the same teeth-cuts in this one.

We need the middle of another dance. We cut it open, we are obsessed with the straight cutter.
We prepare the detail in a green color. The other three are in red and orange. We choose the design of the cage. Twist the rectangle around the tube. We sell it in the neck of the first part.

Glue to the bottom of the tube one day before another dance.

The lower part from the bottom of the first dance is glued to the animal to the green part of the structure.

A very simple model, which is suitable for beginners. At the same time, the flower turned out great and great. Before speaking, for farbing it is necessary to select a farb that is waterproof, so that it is not harmful to the rain and water.
 New ideas for parties in the garden and the city. Author https://www.youtube.com/watch?v=L56LZZHYf8k
 Another version of the kvitka from the neck from the dance. There are 7-8 rounded pellets on the upper part of the dance, we push them out.

I use PVA glue to glue papier as quietly as toilet papier. If there will be inconsistencies, there will be a plus, the texture of the kvitka will be different.

We glue the pellets on both sides. If the glue is dry, it can be filled with water-resistant paste, or acrylic. If you plan to decorate the flower just like the sky, then you need to cover it with 2-3 balls of varnish.

The baby's hair is fixedly dripping, having bent it into a loop.

We twist the cap, glue 3 cotton buds and a pompom into the middle of the cap.

Flowers are ready to add color to your garden.
 Author https://youtu.be/LlwlX2AGbkU
 The axis is still garni kviti iz plyashok s-pod shampoo. The pellets are rolled, the edges are trimmed over the candle, the crumbs of the pellets are squeezed out after heating, in order to remove the wrinkle on the white edge and in the middle of the pellets.

Using additional hot-melt adhesive, we collect a blanket from 2 rows of pellets - 4 large ones, overlapping, in the middle there are about 4 small ones, glued overlapping.

The larvae are no longer glued. You can buy them, or you can earn them yourself. To do this, apply a drop of hot glue to the edge of the hole and dip it in glitter. You can also make it from PVA, but it will take a long time to dry.
 Beautiful flowers with dancing. Author https://youtu.be/9_WHmwKQQCg
 Marvel at how much frank you can earn from dancing during the day. We cut the day along the curved lines on the dance, rounding the pellets. We trim the edges and the cake is ready.

Another incredibly beautiful and simple card from the website. We cut the bottom of the dance, shape the pellets and twist the edges using a candle.

I'm drowning with farbs and varnish.

From the middle part of the dance there is a flower with five petals of smaller diameter.

Make it a contrasting color.

Using a heated twist, make a hole in the middle and press straight through the hair.

The hair also leaks through the large basket and is fixed with hot glue.

And the axis on the right is a palm tree from a green patch.
And the axis is incredibly beautiful and the flower is beautiful.
The axis is still beautiful and simple kviti from days. It looks really cool if there are a lot of them.

How do you like this idea?

Instructions for making a tulip
Let's make a whole bouquet of tulips. And plastic dances will become for us the best material for creativity! It is easy to make details from them, select designs and paint them in the required color.
In the summer dance, the neck and bottom are cut. The “tube” is cut open.
The upright cutlet has very deep cuts, leaving 1.5-2 cm. cuts carefully through the skin 0.3-0.5 div.
From now on, 3 volume pellets are created. Give it the shape of a speck.
We heat the bases of the skin pellet and glue them together one by one.
We cut out a thin layer from the middle part (just the other parts). Let's put it all together. This is the stem of a tulip.
4 small sheets are visible.

The bud is glued to the stem. And under the bud we place leaves.

Let's prepare a pot. The bud is on the red ones. If required, then the stem and leaves are green.
We collect all the prepared quiches and tie them with the same fringe that was applied to the cob.
We glue the neck to the bottom. Come out with a stable flowerpot. We insert our bouquet into the neck.
It’s just so incredibly beautiful! Tulips can be made in different colors. Their petals creaked under the loose cover, so that it seemed as if the tulips were blooming.

Mac from a plastic bowl for a candle
Poppy is a very tender flower. But as we see from the dance, there are a lot of rocks in our dacha, decorating our landscape. And to give the necessary shape to the leaves and pellets, candle fire will help.
We visualize the details behind the templates: flower, leaves, sepals. The core is still round. And we also need a thin, long-lasting coat, so that we can make cuts every day.
It is best to draw the details from the cans, which represent the color scheme of our parts. If we don’t know the color dances, then let’s get them. It is necessary to work only after we have heated and collected the parts into a single structure.

We heat the sepals and pellets over the candle half. This way we give the required shape to these parts.
A long fringed jacket is wrapped around it, but not to the top. At the very top, where there will be a kvitka, we remove 2 cm of the bare dart. To fix the plastic, be sure to hold it over the candle.
There are also small cuts along the edges of the leaves. We give the shape to the leaves by heating them over a candle.
We remove the leaves from the stem by heating the plastic over the fire.
We roll the sepal open in the middle and place it on the exposed edge of the dart.
This is how we plant the flowerpot itself.
The edges of the core are cut into fringes. Heat over the fire until the edges fluff up.

We put the core on the ground. The edge of the hole is bent, fixing the details.
Glue red and green circles to the top of the dart.
It will come out as hot as a fresh poppy! You can choose the size of the pot yourself, from miniature to large.

Another option for poppy seeds - the simplest, but not the least beautiful!

How to grow tulips with your own hands with PET
Now I will show you how to make a bouquet of tulips that have bloomed. It’s so original to come out, I can’t believe it’s so simple! From just one preparation, we’ll make a bud at once!
The square is clearly visible.

In 4 parts, carefully cut to the middle, leaving 0.5-1 cm, no more!

The edges of the 4 pieces that came out are rounded.

We heat the mixture over a candle, shaping the flower so that it looks like a tulip.

To do this, we trim the edges of the bud over the candle, then trim the middle of the bud over the candle so that it fits into the bud.

We add three pieces of pellets, overlapping one on top of the other, and warm the three pieces over the fire.

The center of the knuckle is lightly pressed over the fire so that it turns into a black color.
We cut a long line with a width of 0.5 cm.

It is heated over a fire and wound in a spiral.

One edge is cut wedge-shaped. We warm up the hot spot over the fire. So we carefully cherish the little bundle.
It is rotated in the middle of the workpiece, the hole is opened. We pull the wedge into the opening of the bud. Fixed with glue.

The neck and part of its height are cut in a two-liter dance. We cut the height until it reaches the neck by 5 cuts.
The edges of the skin are rounded to form a leaf shape.

Over the fire, we give shape to the skin sheet, straightening and stretching it with our hands. The bouquet is ready.

We insert the letters before it. We lower the workpiece into the potter. We use cement to cement the structure together: we pour it into the potter.
Such a bouquet is not afraid of rain, snow, or sun. It’s wonderful to stand with the richness of our garden in front of us.
 How to grow tulips with your own hands from PET https://www.youtube.com/watch?v=Vtrsj0e3-gA
 Master class for cobs from the creation of Pivonia
In fact, it’s already easy to create a new one, as you can use templates for virtualization. Without them, you can cut the workpiece into thin slices, 1.5-2 centimeters in length, round the edges, like in pellets, and then construct a pivonia from this part.
Can be created using 3 templates of different diameters.

The pellets of the blanks are given a shape over the flame of a candle.
Prepare preparations.

We glue the blanks one into another (according to the diameter). 
The axis is ready! If you want to place him on a leg, then heat a thin mixture from a plastic bowl over the fire (stretch the mixture slightly). Viide the stem. Until then you can glue the visor leaves. Add this mixture to a green color and combine with the butter.

Dzherelo
More variants of pionia and pion-like trojans.

Orchid from a plastic doll - instructions for use
It is difficult to create flowers as beautiful as orchids from such unnatural material as dance! For this purpose, you can choose containers of different colors, and you can prepare a mixture after molding.
We see the details of the colors and leaves behind the templates.

If necessary, we prepare these and other parts.
All dough pieces have a hole in the middle.
We string them onto a toothpick. It would be better to use half an ear stick so that the part with the wool is formed on the front part of the stick. Everything is secured with glue.
The parts for the buds are glued to half of the ear stick.
Cotton sticks are attached to the end. This tree dries firmly to a great size to serve as a stem. We place the flowers in order throughout the stem.

The large stem and small stems are wrapped with tape.
The orchid leaves are secured with glue at the very bottom of the structure.
Kvitka "sadim" from the miner. Fixed with stones, cement or other materials.
Such a pot with an orchid will brighten up the garden, or you can install it just above the threshold in a booth.

Dzherelo
Video about how to grow lily, chamomile, twins, lotus, daffodils
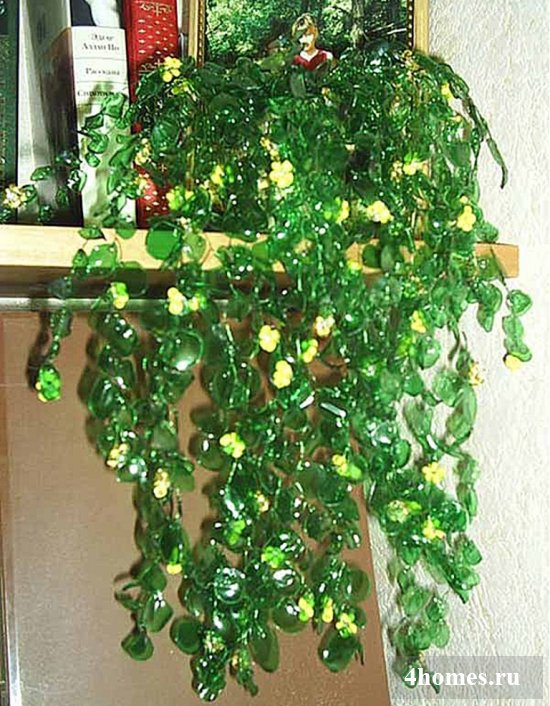
Of course, the choice of viruses from different colors is excellent. And all this is because plastic dances are a wonderful material. Here I added a small selection of videos to different colors. For tubs, you can choose a variety of colors for the flowers, choose different sizes and methods of fastening. For example, several rows of flowers can be planted directly next to the bed, like a kind of park. For others, arrange the composition. And the third one is used to disguise the walls of unattractive buildings. And in this case, it is possible to vikorist the buds of flowers without stems.
Dzvinochok
Chrysanthemum

It’s amazing how beautifully you can wrap an old stump or a tree stump.

Tell your friends about the collection and definitely help them make an advance payment, so that they become regular visitors to the site, can discuss different topics with us and create masterpieces for their home and garden!
I’ll be honest, I used to be skeptical about the outcome of the dance, but after looking at these earrings, I changed my mind.

![]()
Nowadays, making eggs with your own hands is a popular pastime, and craftsmen choose a variety of materials that can be called smitties, such as vikoristan plastic balls. You can simply throw them into a mixing container, or you can transform them into something more beautiful.
Flowers made from plastic bowls can decorate a garden plot, a children's play area and decorate your home interior. For such a handmade product, there is no need to buy expensive materials and materials, and the result can lead to waste disposal.
This is widened among gardeners, the cibulin plant has the color of a garish aroma, which is formed from the impersonality of small fragrant flowers.
Of course, you won’t get the fragrant hyacinth from dancing, but you can then create a miracle copy with enough materials at hand, and following instructions:

Using this method, you can produce a number of readily available plastic hyacinths - for the garden, home or other needs.
Yaskravi dormouse
Perhaps, great, the dormouse flowers of dormouse and summer flowers - mini-dormouse. And if you make a flower from plastic, you will delight the whole river with your brightness.
The following materials are required:
It’s easy to prepare the dormouse, the instructions will help you understand the process:
- The plastic dance is cut into 3 parts - the neck and bottom are cut off.
- Rashta, which is lost, is cut into large-sized pellets, but not until the end.
- After this, all the petals are bent so that they take the shape of a flower.
- Then they need to be prepared from the outside and inside - you can use acrylic or aerosol mixture.
- They themselves need to make money from the plastic dances that they have lost.
- Once all the parts are dry, they need to be assembled onto the motherboard template - one part is inserted into another and glued together.
- After this, the core is inserted into the middle of the flower - the bottom is made from a dark patch and is also glued.
In order for such plants from plastic balls to become full-fledged fruits, it is necessary to form a stem from metal vines. Finally, you just need to coat it with a green paste, attach a splinter of leaves - and that’s it, the decoration for the garden or the booth is ready!
Pishna chrysanthemum
Another luxurious flower, a chrysanthemum, looks no less impressive from plastic. It’s easy for beginners to make similar flowers from plastic bowls with their own hands, and then prepare them for the next step:

Chrysanthemums - flowers from plastic dances Meister Klass:
- It is necessary to remove the cylinder (about 11 cm in size) from the plate and the lower part.
- The walls of the cylinder are cut into narrow stripes - 4-6 mm at the edge and up to 9 cm at the bottom.
- The improvised petals are opened at the top, and then twisted in the middle with the help of two sheep, so that the spirals come out.
As a result, the fluff of chrysanthemums comes out, but is not quite similar to the real thing. You can “revive” them, vikorist and acrylic paints or nail polish - the color of the stench will turn out even brighter and more beautiful.
But the masters of head-made supplies have more than one way to make money from plastic balls. For example, you can use another method:
- The neck and bottom are cut out of the plastic flap.
- The cylinder is cut into narrow rings - about 6 mm wide - so that the number of parts is laid out, how fluffy the chrysanthemum head comes out.
- There is one small opening on the skin ring (no wider than 1 mm).
- At the dance day, 2 small openings are opened, and hair is passed through them. They are tied to a knot from the inside.
- All plastic rings are strung onto the hair, and the rest is carefully moved to the base. From them fluffy pellets will emerge, and the chrysanthemum will be rich.
- The pellets are fixed behind a paper clip, and the end of the hair is tied into a vuzol.
You can make a bunch of colors and pick them up from a wonderful bouquet.
Miners and wazi for dances
Plastic flapper is a universal flexible material, which can be used for making miscellaneous speeches, weaving cats, organizing flower beds, boxes for seedlings, garden displays, etc.
You can also make a wonderful pot for knits from a plastic bowl, if there is a need for something new, and there is no good one nearby. The simplest way is to use a gorschik, a vikorist and a plastic dance and a disc - CD or DVD. In addition, you will need a hot glue gun and a stick.
The preparation process consists of the following steps:
- Make marks on the dance so that they are evenly cut into 2 parts. The edges can also be made wavy or tricut. If you use a soldering iron, the edges will come out smooth.
- From one dance come two players - a potter from the part of the dance, the other from the disk and part of the dance.
- Using a glue gun, the center of the disk is glued to the neck of the dance.
You can decorate a leather potter to your liking - you can cover it with tarpaulin, create an ornament using an additional stencil, paste it over with pieced stones, turtles or other materials.
In addition, wonderful vases come out of the dances to create a nice vibe, prepare the following:

Once everything is ready, you can start preparing the wazi:
- The upper part is cut from the dance;
- the edges of the parts are covered with duct tape so that the stench does not affect the water;
- In order for the farb to lay more beautifully on the surface of the vase, it is necessary to cover it with a primer;
- when the primer is dry, you can apply a Farby ball;
- If you want to show your imagination, you can step by step paint the vase in a number of colors - cover the top with one ball of farby, let it dry and seal the edges with electrical tape, and those that are left out, fill them with electrical tape You can only remove it if the farb is dry enough!).
Plastic vases can also be decorated to suit your needs or made unfinished. In addition, they can be used to create entire compositions, vicorous splinters of different sizes, or in the same style and color.
Viruses made from unattractive materials, including plastic bowls, often turn up the cluttered look, and the stench of the table comes out sophisticated and neat. The flowers can be the same color, it is enough to report at least a creative approach.
Most people don’t waste plastic containers that are out of stock, and they throw them away, because they can be more stagnant. Nowadays, it has become popular to make all sorts of decorations for your home, garden, or allotment plot with your own hands from plastic balls. The most extensive decoration is plastic paintings.
Do-it-yourself viruses from plastic dances: kviti

The original plastic sheet can become the main material for the preparation of flowers of incredible beauty, which can be used to decorate not only a house, but also a garden plot. They are not afraid of strong winds and heavy rain. In addition, the preparation of this product does not require a large number of additional tools. All that is needed is farb, knives and grinds. It’s time for the head to work - diligence and a creative approach.

It is best to choose solid plastic pads: such as household chemicals, shampoos or lotions. This container is thicker, already pre-fabricated, which is simply necessary for the creation of flower compositions, since if you apply the farb to the pellets manually, then the street minds will quickly “slip” in the eyes of vologists or crack in the eyes of sleepyheads exchange them. The basic stages of the work are the selection of the pattern, the selection of elements of the required shape (depending on which pattern is selected) and their connection one by one.
Convalias of plastic dances

It’s very beautiful in a garden plot of a dacha or a private booth to see the convoys made from plastic dances. All that is needed to make an original flower composition is a white or dark container. Drinking milk is good for buds. If a suitable color has not been found, you can use special acrylic-based paints. The size of the buds depends on the master's preference: the more buds you plan to produce, the more buds are required.

Master class with prepared convalia with plastic dances
- The end of the container comes from the very top part of the container, to which the stopper is screwed, so you need to cut it across.
- From the edges, it is necessary to make pellets of the correct beautiful shape, slightly bulging, in order to give it a realistic volume. To achieve an effective new look, you can lightly heat the plastic, immediately giving the required shape to the pellets.
- Next, you need to make openings in the corks and pull them through them, after which you can tie the bud and the stem behind it. This can be made from the same plastic green color, first seen from the cutouts in the form of a spiral.
- Then, wind the helix onto the base(s) from a metal rod and heat the structure a little over a hot fire until the material begins to melt. Now the nail is ready before stringing a ring stitch on it.
Lilies from plastic dances

A beautiful, effective lily can come from a small, slightly splashy bottle in a white color. An obvious advantage of such containers is the necessity of giving the shape of the pellet in addition to their destruction. As soon as the bottle remains, cut off all the parts, and the viginas can be formed by heating the material over a hot fire. Other durable instruments are made from plastic tubes or metal ones.

Master class on making lilies from plastic dances
The sequence of the work sequence looks like this:
- Cutting the upper parts of the container: both the plugs and the neck.
- Virizanne of finely shaped pellets.
- If you need a larger amount of pellet, you need to heat it a little over the fire. Care must be taken during the process as fragments of the virus may become deformed due to high temperatures.
- Fabrication of lily heads using orange fabric based on acrylic or oil.
- Preparation of stems from tubes.
- There is an opening in the plastic tube into which the leaves are inserted.
- Connection of the head with the stem (required drill).
You can replace plastic tubes with metal rods. The leaves are twisted to a new thin dart. Varto vrahuvat that lilies bloom with flowers, then the most effective looking flower bush. The preparation scheme is simple: you need to make a bunch of rosemary flowers, and then connect 3 stems at once using vicor and a primary adhesive stitch.