Whatever the weather, you will be in a wonderful mood, master new speeches from the people at hand. Shvidki virobi, prepared in less than a year.
statistic:
Sometimes you want to pamper your child with a new toy, but you don’t have the financial capacity to improve it. That's why we decided to select for you the most simple things you can do, on which you will spend no more than a year. The family budget is not affected, as long as there is a stink of wasteful material and all sorts of surpluses.
How to make a doll from thread and a kulbaba with your own hands?

You create this while relaxing in a quiet chair. Head, put everything in order so that you don’t have to get up again. Tse:
- threads;
- forging a sheet of cardboard;
- knives;
- alternation of fabric with flesh color;
- markers.
- Wind the threads around the leaf into a large ball.
- Re-knit the finished winding with thread. Viznachte de will be the head of the doll. Mark it by also rewinding it with thread.
- So it’s easy to arrange the right and left hands. To make tassels from thread, wind your hands at the same level as your wrists, cut the yarn in the area of the fingers of the toy.
- Also, use threads to strengthen your torso and legs, and then use the same technique as your arms, just to make them longer.
- Measure the flesh color fabric according to the size of the head and glue the sides together.
- Wind the hair threads around your hand and cut through the roll on one side. Glue it up to the head, cut the forelock behind the crown.
- Use markers in different colors to paint the rice.
- Sew a sweater for the toy or tie it with a cuff of fabric to create an apron. You can tie a hustka on your nose so that it becomes a cloak. The details of such a garment are filled with satisfaction, like melodiously appreciating a new doll from the thread.
If you are working with a baby doll, you don’t need to mark her legs. Don’t let the threads cut at the bottom become a match.
Such simple songs, melodiously, will please the children. You can also create fluffy kulbaba from excess threads.

For this benefit you will need:
- yellow and green yarn;
- drit;
- PVA glue;
- knitting fork or metal bracket;
- knives;
- Tsiganska that thin head.
- Wind the yellow yarn onto a knitting fork. Thread a thread of the same color into the gypsy's head. Sew it in the middle.
- It is good to coat the line that has come out with glue. Remove the fabric from the yarn from the fork and roll it with a roller.
- A thread is wound in the middle to create a dumbbell shape. From the top, coat the middle of this part with glue, caulk until dry.
- Such simple viruses thrive on both adults and children. The stinks of the shvidko are getting ready, but for about an hour, go to those to check the docks and dry the glue. It’s better for him to work in the evening, and continue to work hard the next day. What shall we do now?
- Cut the dumbbell that came out in the middle. On the first and other flowers, you need to cut the loops with scissors and carefully comb them so that the fluffy caps of the two flower heads come out.
- The green yarn from which the sepals work must be cut into 4 cm long sections. The same thread is drawn from the gypsy head, sewing the sections across, not in the middle, but extending 2/3 from the edge.
- Cut the top with scissors, having trimmed it, create another row parallel to the first one.
- Apply glue to the collar side of the flower and attach the sepal here. Wrap it with the same thread that was used for stitching. Glue the ends together and prepare to dry.
- In an hour, wind the green thread onto the glue-coated thread. Viide the stem.
- Place the stem from the bottom into the sepal, twist to create an opening for the stem. Place it there, first coating this part with glue.
- The leaves can be tied with a gag, or as we can easily do, cut them out of green paper or cardboard, and glue them onto the stem.
How to quickly produce germs from the tissue of creatures?
If you want to spend less than 30 coins on making a new toy, then you can create such funny bears. There is no need to sew. Having created the slits in a singing manner, you will master these rodents.

Marvel at what you have:
- felt pieces;
- straws for juice;
- Namistiny or little gudziki.
- For a leather bear, you need to make two parts from the same fabric. The first part will become thick, the muzzle will be pointed, and the other side will be rounded. Vukha vyzhte u vglyada vіmka.
- From fabric of a different color you need to make a small circle for the nose and two larger ones for the ears, and glue them in place.
- Using scissors or a stationery knife, make 4 cuts on the body of the bear. Two will be vertical, on the floor, and the other two you will make in the rump area to insert the straw here. Place the ears on the head, inserting them through the slits.
- Stop gluing the truth or the visors instead of your eyes and marvel at how quickly things are made from simple materials.

If your child is bored, you can work on it with fabric appliqué. Such copper rabbits are sewn onto the frayed knees of children's pants to renovate this area.

Transfer the appliqué onto the fabric and press it. They decorate the bunny by sewing a bow on it and a carrot on the body. Attach your eyes and other exposures. If this is an application, then you need to glue the hare onto the cardboard.
And the axle is simply a bird - you can see the birds. You can make these out of excess felt, glue noses, eyes, wings and play a home show.

DIY pine cone spinners for children

It’s also easy and quick to kill them.
To create gnomes, take:
- pine cones;
- light plasticine;
- felt or fleece pieces;
- glue;
- penzlik.
- Let the child download a bag from plasticine, and use the collar side of the penzlik to create something for the eyes, mouth, and nose. Fill them with sheets of plasticine in a similar color. So the eyes can be brown or blue, the mouth red.
- Attach the head to the top of the cone. Create a trikutnik from felt, glue its sides to form a cone. Place this cap on the character's head.
- Twist the mittens from the excess fabric and secure them up to the bump with plasticine.

For such a virobus of cones, a yak owl, we need another:
- 2 caps of acorns;
- Zhovta farba with penzlik;
- plasticine;
- accessories at the front, stitch.
- The top of the cone and the cap of the acorns need to be ground and then left to work until the smell dries up.
- Let the child roll small balls out of black plasticine, stick them to the inverted caps of acorns - that's all.
- Make a nose out of orange plasticine and attach it to your place.
- Such an owl with a cone is decorated with feathers or stitches.
- pine cone;
- pieces of fine fabric;
- two toothpicks;
- cotton wool;
- 2 sticks frosted;
- white color
- Let the child farce the ghoul, take her away until she hangs out again.
- Mom wears a scarf made of fabric, knitting a snowman around her neck. Use felt to make headphones and glue them to the character’s head.
- The baby should make a snowman’s nose and mouth out of plasticine and attach it to his face.
- Prepare your hands from the dart, burnt with soft fabric or stitching. You need to twist the cone with a dart.
- Place toothpicks with cotton wool glued to the bottom of the snowman's hand.
- Soak the sticks from frost, and when they dry out, place them on the snowman's face.
Shvidko and just shy and such piglets. Glue the pieces to the yaline cones from the cones in front of each other. Attach the piglets, which will become hats shaped like acorns. You can use plasticine instead of glue for this.

Farbe the piglets from the horny colors, you can use a can of spray for this farbe. When it’s dry, just after this you attach small black sticks, which will become ochima.
For this virus, a cone is needed that has not opened. Once upon a time, the little pieces will open up. To avoid this, remove the cones from diluting wood glue with water on the surface.
Get them out of the way, get cowardly. After 3 days, the pine cone will dry out, securing the pieces so that they will no longer open. After this, you can cover this natural material with porcelain and create new items.
The simplest attack is a forest patch. For her take:
- CD disk;
- plasticine;
- Yalinovu and pine cone;
- an acorn cap;
- glue;
- farbi;
- A bucket for toys.
- Soak the disk in a green color and paint little flowers on its surface.
- Let the child download the droplets and legs of the mushrooms and eat them.
- The basis for the hedgehog can be made from plasticine or polymer clay. Then cover it with brown tarpaulin.
- When it’s dry, line the back of the skin with small pieces of yaline cones. Place a cap on your youma's head.
- Glue on the eyes, nose, mouth, and place a reed stick in your hand. In another case there will be a cat with mushrooms, like plasticine.
- Attach the hedgehog to the stand, then another miracle is ready.
Tie floral thread to the cones, place the rose flowers in a jar, wrap them in front with a skein.

You can also make another variety of pine cones for the garden, such a wonderful decorative cat.

If you need to quickly create a baby to bring to the nursery, glue its body and head from beige plasticine, and remove its eyes and nose from black plasticine. Build up now, as if you will become thorns.

Forgive me for a good mood
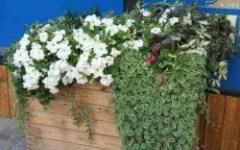
There is rarely any sunshine, and the weather is becoming more and more gloomy. In order not to succumb to evil at this time, create beschet twists that will immediately improve your mood.

It’s such fun to settle in a vase’s apartment that it’s almost like paying for nothing. For them you only need to take:
- color papier;
- cardboard in a white box;
- marker;
- stationery Nizh;
- stitch;
- knives.

Paint the eyes with a black marker, fold the pelyas forward.

Place the stem on the cardboard. Glue the finished part on one side, and on the other side, glue the cut out flower with pellets on the back.

Bend the green arched paper, paint it on a new oval line, and follow it. If so, use zigzag-like knives. Sorry to make some notches.

Tie the paper stitches with a stitch, as well as taffeta, and use them to decorate the whole fabric. You have a bouquet of flowers that will never wither, and will delight you.

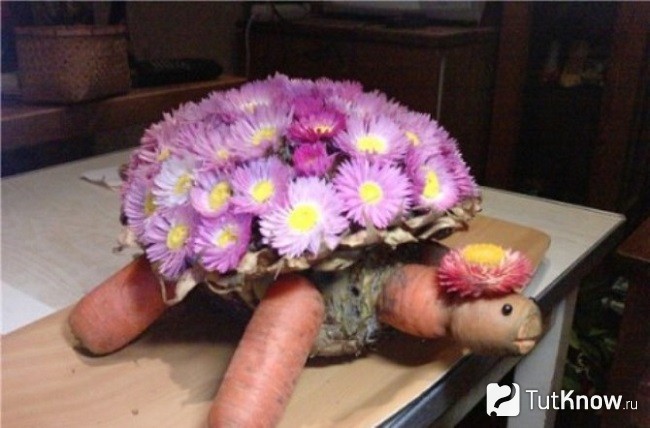
You can attach the fruits to a toothpick or a pineapple. Weed a garni shell for a turtle. You will make your arms, legs and head from carrots. Attach these parts to the body using toothpicks.
If you want the New River to arrive, decorate white objects in the apartment by turning them into snowmen.

Attach dark magnets to the refrigerator, and the holy character will already settle in your kitchen. If you paint on a white vase or glue round eyes and an orange nose to the appearance of a carrot, then another snowman will amuse everyone who gathers at the table.
It’s amazing how simple and simple a virus can be modified.
Among all the materials for creative work, a simple paper occupies a special place: it can be used for many viruses. Adults and children love to work with this material. Easy toys with paper origami are available for babies from 3-4 years of age. Any creative activities will contribute to the intellectual development of children.
Origami (folding figures from paper) has long been a popular pastime: history has been going on for centuries. Since previously it was only accessible to the Chinese and members of the nobility, with the increased availability of paper sheets this type of creativity has gained popularity in rich countries around the world.
Little children do not like to sit in one place: little ones are attracted by the novelty of the extra world. Already from 3 years ago it was necessary to prepare the child before starting school. The main benefits to restless behavior are sitting still, learning to memorize and acquire new knowledge. The development of these and other aspects of character can be helped by various types of creative work made with one’s own hands.
Virgos develop fine motor skills, become accustomed to neatness, and sitting still. Just before we get busy with origami, here we go:

- development of spacious thinking, logic and memory;
- knowledge of the basics of mathematics, geometric principles, development of mathematical concepts of children;
- Please read the diagrams, armchair;
- development and training of motor skills;
- the cultivation of calmness, directness, scrupulousness and accuracy;
- knowledge of beauty and harmony.
How to keep the baby occupied at home, how to keep the little one calm at all hours, and how the father often praises the food. The folded figures from the paper not only quiet the restlessness, but the little man has a lot of brown berries.
The availability of this type of work is determined by the availability of the material. Stores offer ready-made sets of colored, corrugated, oxamite, and metallic paper. For simple and easy viruses, you can use old newspapers.

It is recommended that children over 3-4 years of age start making paper figurines using the origami technique. However, there are a number of simple models of figurines that can create a courtyard toddler. With simple origami and paper, children are beginning to learn about preschool activities.
At home, Matusya can organize lessons for the baby herself, creating light and beautiful figures from paper.
On the Internet there are no simple paper origami for beginners - diagrams with step-by-step instructions for assembling paper models.
First models for babies from 3 years of age
Nowadays, in addition to classic origami, there are also other types, and for beginners and young children, it is best to start learning about origami from the simplest classical schemes. Classic origami is the folding of models from square arches of paper, which does not stagnate during the creation of figures without glue or a knife.
The simplest germs for cobs include: fly, boat, tulip, dog or intestine. Let's look at how to create these figures step by step.

Tulip
A simple model of this kitty with the help of a mother can be used to pick up all the little ones. The older the child, the more complex patterns for the creation of a tulip are available: the smells come out more voluminous, with buds that have opened. A simple scheme for a baby of 2 years, allowing him to develop a rich culture, and giving his mother a reason for pride.
Stage one
Take a red square paper bag. Help the child bend it diagonally. Unfold the sheet and fold it across the other diagonal.
Stage other
Pull out the tritucle and bend the curls towards the center line. Bend the lower tip of the bud. You have a tulip bud in Viishov.
Stage three
Take a square green paper bag. Bend the bundles, straightening them to the diagonal of the square.
Quarter stage
Once the figure has been removed, fold it in half. Viide green trikutnik. Bend the bottom curl of the figure - you have a tulip stem.
Fifth stage
Gather the flower and stem on a thick paper base. An applique of a tulip using the origami technique has been released. Virib looks even beautiful. You can give this leaflet to your mother or grandmother.
This is a simple scheme, but there are no folding parts. A child can master this virus under her mother’s care.
Knowing the technique of creating a dog will help you create the creature.

Dog
Stage one
Bend the paper square diagonally. In front of you lies a trikutnik, which has a straight cut and a straight bottom.
Stage other
Bend the top two bundles down so that the ear comes out.
Stage three
The lower mound will go uphill - a dog’s face will appear.
Quarter stage
Let the little one paint the eyes and nose of the dog. He grows his vib as he should.
Panda
Necessary white paper. Prepare black olive, felt-tip pen chi farbi. For pandi, white and black colors are relevant.
Stage one
It is necessary to mark the line of death. For this, a square sheet of paper is folded diagonally, and the rolls on the left and right sides are folded forward.
Stage other
Fold the top corner at the gate side.
Stage three
Replace the pandy's face around the edges.
Quarter stage
Bend the bottom corner forward. For the spout, fold the top edge down to the bottom.

Fifth stage
Painting the face.
Before the light figures there are cars and tanks. Larger folding models – those with images of birds, komakh. Children aged 8-9 years can independently work on human origami. The creation of such a figurine brings out the richness of the classic folds and advanced motor skills of the child’s fingers.
To create a new mood, we use a variety of light models of eggs and voluminous snowflakes, formed using the classic origami technique. Paper weddings are even more popular among girls. However, similar models are suitable for folding masters. To master the technique of creating a paper ring, you can learn from special master classes.
Video games
Finger dolls reach the toys' first lungs. For additional help, you can visit theatrical shows for children. Paper fingertips can be made for figurines of creatures. For dolls, you can create a garne of furniture, furniture for dolls.
The older child will work on more folding models to play with.
Let's take a look at some easy origami diagrams from a paper to create a toad and a flyer.
The most popular type of virobu. You can earn money for a few bucks. For the creation, please use a piece of paper.
Stage one
Take a rectangular landscape arch. Add it to the dovzhin in full. Rozign.
Stage other
On the side where the flyer is carrying, bend the bundles 2 times, straight them to the center line: the first one under the straight curl, the other under the straight curl.

Stage three
Bend the sharp tip of the nose all the way, directing it to the center of the wing so that it diverges.
Quarter stage
Bend the letak blank in the middle.
Fifth stage
Bend the model in the middle, clearly forming the wings.
Such a flyer can be made from an ordinary woven sheet or a piece of newspaper, and mixed with a small piece of grease, which will allow it to fly. This type of lung virus is one of the simplest and most beloved among children and rich adults. Sometimes for making books you can use landscape leaves. The virus becomes more important, then more resistant to the wind.
The toad that is stripping
The paper's toad, because it can shave, is suitable for children of all ages. Schemes on how to easily make a toad that is cut can be found in various versions. Let's take a look at the classic diagram.

Stage one
It is necessary to fold a square sheet of paper diagonally. In front of you is a straight cutter with two squares.
Stage other
Fold the top square along two diagonals as well. Light up. Gently pull the backstretchers of the right side together with your fingers to the center. Fold the square that is below.
Stage three
Direct the opposite sides to the center. Bend the lower part completely again.
Fifth stage
Pull the two upper parts of the lower part down. Pull the parts that came out along the bend, straightening them. When you bend the bundles, the lower legs of the toad come out. For the upper paws, fold the upper knits down.
Stage six
The lower part of the torn-off sheepskin coat completely bends. Then push the little bits down. Turn over - the toad that is shaving is ready. You can paint on your eyes.
These lungs will forever bury your baby in the world of origami.
Shvidka navigation for the article
Making paper eggs with your own hands is a simple, inexpensive and useful activity for both children and fathers. All you need is paper, scissors, glue and a few ideas. In this material you will find 7 step-by-step master classes from handicrafts from different types of paper and 50 photo ideas for your development.
Idea 1. Volumetric viruses
For the smallest handicraftsmen, we recommend that you simply create a paper based on the appearance of such a cat.

Materials:
- Arkush paper A4;
- Knives;
- Glue.
Instructions:
- Decorate and unpack the template (below the cat template) on a white or colored paper;
- Create a template with scissors, and then make 4 cuts along the marked lines;
- Bend the accordion along the pattern and twist the tail;
- Fold the dotted lines along the legs and glue them to the cardboard.
For older children, there is a more complex version, including a master class with the preparation of a volumetric bird with a paper in the form of a bird.

Instructions:
Krok 1. Design and unpack the layout diagram (div. below). Please ensure that the file contains a barless template so that you can create it on a color-coded paper.
Step 2. Draw all the details accurately using continuous lines using a breadboard knife.
Procedure 3. Fold all the lines according to the principle: thick dotted line = fold in the middle, thin dotted line = fold in the middle.
Step 4. Glue the parts one by one, applying glue to their bundles (marked Glue). Follow the offensive order:
- Glue it first to one side of the bird, then to the other.

- Glue the back of the bird to the side, as shown in the photo.

- Glue the krill.

- Now take a part, which is the bird’s breast, and fold it on one end and fix it with glue, as shown in the photo.


- Take the legs, turn them over so that the knees are spread out at 90 degrees, then glue the legs.

- Well, that’s all, all that’s left is to glue the legs to the body and your volumetric vibration with the paper is ready. In exchange, you can make a whole bunch of these birds with your own hands in different colors.


Idea 2. Wall panels, paintings and applications
Apparently, you can paint not only with farbs on paper, but with... paper on paper. Such activities are no less useful for developing hand-eye coordination, fine motor skills, sitting still, smartly planning your work, combining colors, shapes and materials.
The current collection of photos presents ideas for paintings, panels and paper appliqués for children of varying levels of difficulty.


Before speaking, the appliqué can be made from details of the same shape, as well as different sizes and colors. This can be either mugs or hearts. The next slider presents examples of such viruses from the paper and schemes for their preparation.


And there are also a number of applications of different types of viruses from paper.

Now it’s time to learn from the master class how to prepare an original, and even easier, product from the paper. There is no doubt that such cute figures will help pique a child’s interest in reading books.


Materials:
- 1 arkush colored paper in A4 format;
- 1 flask of white paper, A4 format;
- Knives;
- Olivet glue;
- Markers, olives and farbi.
Instructions:
Procedure 1. Fold one half of a white sheet of A4 and let the child independently paint on it the cover of his favorite book, signing the name of the author.
Procedure 2. Cut three long smugas from a colored sheet approximately 2.5 cm wide. You will have 4 parts: 2 smugas for the legs, 1 smuga for two hands and one rectangle for the figure’s body.

Work 3. Take two folds (for legs), fold them like an accordion, and then glue them to a straight tube.
Step 4. Divide the remaining stitching that was lost into two equal parts, paint on the ends of your fingers and glue to the tube.
Step 5. Fold the top part of the figurine onto the front side and cut its side using a knife, as shown in the photo.

Croque 6. From the halves of the white sheet that are missing, make a stake and glue it onto the figure so that it is not the eyepieces.
Lesson 7. Draw on the details: eyes, mouth, nose and eyepieces with a black marker.
Croc 8. Now glue the book to the figure’s hands and decide to put it on the table or hang it on the wall, for example, as a book police.

Idea 3. Headwear
All children love to play with toys and for this purpose they play everything they can get their hands on. To provide your child with props, you can make fancy headdresses from her at the same time. Before speaking, such recipes from a colorful paper can be prepared for one or many children for a party, a masquerade, a themed National Day or any costumed saint. In the next set of photos you can see the butts of various paper “hats” - from pirate jerseys to gloves.


Today we encourage you and your little one to get a hat that looks like a dinosaur’s head. This master class is so simple that children in the age of 3 years before you will need very little help.

Materials:
- 3 arches of colorful paper;
- Olivet glue or PVA;
- Scotch;
- Knives.
Instructions:
Krok 1. Place 4 dark edges about 3 cm on both sides of the paper. Two of these spots are placed on the headband, and the other two are placed on the crossbar of the “hat”, on which the dinosaur’s spines are glued.

Step 2. Take two other arched papers and cut them into strips about 5 cm wide along the short side of the paper. You can remove and cut out the darkening on the eye, but in the pouch you can get 5 darkenings per skin area. We need these blanks for making hairpins.

Step 3. Fold the leather piece on the side and, extending about 1.5 cm from the fold, paint a mark on the appearance of the trikut, with a height up to the very edge (amazing photo). Then just adjust the current pins.

Croc 4. Glue two cross sections, and then glue the spikes on them in a row, as shown in the photo below.

Step 5. While the glue is drying, adjust the size of the two parts of the head so that it resembles the stake of the baby’s head, and then connect them together with additional tape.
Croc 6. Now let's turn to the hairpins. Turn the cross over so that the pins rest on the table and carefully bend the skin over them (amazing photo). Form the first pin: cover one side with glue and connect it to the other. Vicorize the violins to fix the tenon and prevent the glue from drying out. Repeat this step with a grid of pins.

Step 7. After the glue is dry, remove the staples from the tenons and simply glue the cross to the head in the front and back parts.

Idea 4. Toy figures made from toilet paper sleeves
Sleeves for toilet paper are wonderful preparations for children's viruses that just need a little bit of embellishment. For example, you can make such wonderful toys from them.


I really love creating things in style unexpected speeches. I especially appreciate mayor's fairs and all kinds of exhibitions of folk art. But at the same time, I never avoid flea markets and small shops selling junk! It’s easy to remove the unattractive substance there, since all you need is a knife and glue and you can turn it into a charming solution.
Like at an expensive store designer decor I gave a one-year anniversary. I immediately marked the unusual dial! I really wanted to buy these, but the buttermilk fell off when I looked at the price tag. The anniversary was so beautiful that on that same day I earned the same. And I didn’t have a chance to buy anything, the book and old alarm clock were missing from me, and the hour needed very little - just one hour!
Since then, I have accumulated a large collection of accessories and decorative items, which were made from improvised materials in at least an hour. Just do it yourself They will always be loved when you need an original gift and want to spend an hour in love.
Make your own lungs
Today's edition "So simple!" I prepared for you a selection of colorful speeches that you can develop on your own. Vikory's imagination is a creative approach for creating powerful masterpieces!
- Clippers for headphones
A really cool thing for musical fans. Watch the instructions on how to create a seal, and you can decorate it to your heart’s content with decorative tape and stickers.
- Anniversary at the Book
You can get such an original anniversary by misunderstanding the master. If there is no drill, pierce the opening with a flower, a vikor hammer. The main difficulty lies in the fact that it is necessary to accurately assemble and secure the original mechanism. To prevent the book from falling apart, glue the sides together or create a seal on the cover.
Marvel at what a treasure you can earn from different books.

- Cover made from a can
A brilliant idea to please the lover of this brand of beer and soda. All you need is a sharp edge, maximum care and a little bit of terpene.
- Knife stand
In my kitchen, knives are saved this way. It’s very handy and stylish, and the bamboo sticks can be replaced with fermented sauerkraut, corn or pasta of different colors. A couple of old books will do wonders!
- Stylish notepad
If you don’t have any ideas for a gift, you can make an expensive notebook in just one year. You will need a thread and a clean paper. Just cut the required leaves, lightly and sew in two places at once with a skin covering. The request can be made to the authorities.
- Shkiryan dribnitsi
I always ask my relatives not to throw away old skinned raincoats and jackets. You can make so many accessories from the cloth skins! And sewing is not at all difficult, the maximum is to put a couple of rivets. Return to the Japanese bag below in the picture, such an original solution!
- Yaskrava sweatshirt
No one is insured against epileptic spots in their favorite speeches. But don’t rush to throw them out, watercolor paintings will turn the clothes into a creation of mysticism. And for whom you don’t need to be an artist. Just don’t forget to put some cardboard or glue in the middle of the box so that the baby doesn’t go over the back.
- Snood from a knitted sweater
From a bright bavvy raglan you will have a wonderful accessory for your neck.
- T-shirt with rodzinka
If you’re tired of a T-shirt, you can now make it stylish. Arrived before her was a small porridge of fabric with a hot baby. I like the idea of cats, and you?
- T-shirt with a hole
If your loved one is torn in the most visible place, you can screw it up. Use brightly colored fabric to show respect, the result will be good for you!
- Hanger for towels
This type of equipment needed in a skin room is not cheap, and it is very difficult to find a handmade and stylish one. If minimalism is your style, you can completely replace such a hanger with a beautifully curved haircut made of brass, aluminum or any other metal alloy. Place heat over a gas pan and heat, putting thick gloves on your hands.
- Decorate for girls
My daughter only wears these rainbow springs to school! This decorates your wedding, your wedding, and your girlfriends will definitely not have these. Just wrap the satin and rep stitches on wooden sticks, heat 10 rolls in the oven at 180 degrees and let cool. Don’t forget to melt the edges so that the stitch doesn’t fray. Glue the stitches onto the zipper or hand the gum!
- Unusual vase
A special glass of dance and a spray can of farboi will help you create such a garnished vase for kvits for 10 hvilins. Paint the bottom of the dance with large circular arrows. Flowing down the walls, the mixture creates a smooth gradient.
- Decorate for desserts
Make a homemade cake for Christmas and help decorate it with a sparkling paper. Make them look like a star, heart, flowers and glue them on bamboo sticks or paper tubes. Let us be holy and bright!
Do-it-yourself virobies for the home- a wonderful way to appreciate and escape from bad thoughts. This is real art therapy, and the result is wonderful! Maximize your vikorism when making unprovoked speeches, and contact us for ideas - we have a lot of articles.
Oleksandra Dyachenka is probably the most effective editor of our team. Vaughn is an active mother of two children, a tireless gentleman, and Sasha also has a lot of hobis: she loves to work with hostile embellishments and decorate the children of the saint. The energy of this people cannot be contained in words! I would like to visit the Brazilian carnival. I love the book Sashka - “Land of Wonders without Galms” by Haruki Murakami.
The paper is the most extensive material for viruses for several reasons: low availability, availability, ease of extraction. Of course, you can’t name the paper material, even if everything is stored in your mind, like a paper, and also the complexity of the virus. This may be a simple application for children, or it may be an origami with modules that small children will not fit into. In this article I would like to introduce 10 viruses of different shapes for children and adults. The smells are prepared from many types of paper: plain white, A4 format, colored, corrugated, crepe. There is actually one choice of sheets for notes. Let's take a closer look at the different options it works.
3D leaflet for 8 Bereznya
I want to celebrate the holy day with a gift, but such an unimportant leaflet will not deprive anyone. You can easily and simply celebrate a child between 9 and 11 a.m. with your own hands and give it as a holy gift to your mother or grandmother. To learn how to create a 3D leaflet, you can look at the photo and video description with step-by-step instructions.
You will need:
- Color papier (4 white-colored arches and 1 rye-colored arch)
- Knifes
- PVA glue
- Line
- Olivets
- Double-sided tape
- Farba (buzkova and green)
Robot head:
- The white sheet is divided along the line, and then 4 sheets are folded at once and cut along the line. We need 7 halves, 8 to put in the kill.
- Take half a sheet and fold it halfway 2 times. We have a straight cut, two sides are closed, and two are open.
- We bend the bundles until the other side is closed. We are so shy about offending both sides.
- Now the folded rolls need to be folded again at the gate side, so that we only do it on one side.
- We have a reference point for what kind of vision we have. Work along the curved line on one side, then straighten the rolls once and follow the line on the other side. Thus, we see the shape is similar to a leaf.
- So timidly with six sheets. To get the shape out of all colors, just apply the first piece and trace along it.
- Take the package that came out and place one pellet in it, and then seal the gap with overlapping pellets exactly one on top of the other. You must enter 6 pellets. So timid with all the little letters.
- Fold the cards all over. On the bottom pellets of one flower, stick the pieces of tape on the top part of the pellet.
- On the side part we glue the pellets, just the pellets, carefully placing the pellets on the pellets.
- Now the 4th round is glued onto the 3rd round, and only the 4th round has all the pellets attached.
- The 5th and 6th rounds are glued to the animal like 2 and 3 (only on the side).
- The 7th patch is glued on top of all the others onto 3 patches.
- Fold the rye color leaf like a leaf, now we’ll complete our composition.
- We place the flower on half of the leaflet and use strong tape on the top center of the leaflet and cover it with another leaf of the leaflet. So just glue the other side. Make sure that the sheet lies clearly against the fold line.
- The leaflet is ready after filling the middle of the colors. You can sign the leaflet.
Caterpillar with colorful paper
Such a caterpillar is simple for the viconn and your time is too short. Virus of insurance for children from 2 years of age and their fathers. You can spend an hour with your child in a pleasant and pleasant way, and you will also develop the motor skills of your child’s hands. Let's get down to making the caterpillar with our own hands. 
You will need:
- Color paper of different colors
- PVA glue
- Knifes
- Line
- Olivets
- Felt pens
Robot head:
- Work out the paper with a length of 6 cm and a back of 1 cm (red, green, blue, yellow, violet, brown, black). Colors are to blame for the slaughter, so that the caterpillar comes out like a rainbow and bright.
- We glue the skin together so that the circles come out.
- When the mugs are ready to glue them together in dark colors, you have to remove the color from the mugs. We glue the remaining bits behind the others, which will be the head.
- Use a felt-tip pen to draw your mouth and eyes.
- Use a colored paper to create thin lines and curl with scissors. Stick them on the place of the flowers.
- From a leaf with a green color, you can see the shape of a leaf with a size oriented towards a caterpillar. Our cheerful caterpillar is ready!
Valentine card with corrugated paper
On Valentine's Day, we always give out original leaflets in the shape of a heart, but if you want to make an original leaflet, make one from a corrugated paper. And now I’ll tell you how to make a Valentine card with your own hands step by step with step-by-step instructions. 
You will need:
- Cardboard
- Corrugated paper, red color
- Knifes
- Sirnik
- PVA glue
Robot head:
- Using cardboard, shape the leaflet into a heart shape.
- Cut the corrugated paper into squares of a size larger than 1 div.
- The square with the central part is applied to the tip of the cheesecake and the papier is crushed with a circular hand. So work with squares as much as possible.
- We apply glue to the valentine and begin to glue our winter preparations. When the glue is dry, fluff the paper to make it more fluffy. The leaflet is ready, you can give it to your favorite people.
Bunny for 5 hvilin
If you need a type for a nursery that won’t take too much time, then a large bunny will be an ideal option. The most important thing is that you can connect your baby before the witching process. Let's marvel at how to make a simple bunny with your own hands, following the instructions. 
You will need:
- Arkoosh color paper
- Knifes
- Line
- Olivets
Robot head:
- Behind the arch of the paper it is cut down to 2 stripes with a width of about 1.5 div.
- One smushka is cut into two different smears. The price is approximately 3 div.
- We glue the edges together so that we have 2 mugs.
- Glue them together.
- Another mixture is cut into 3 equal parts. One piece of paper is cut vertically. The thin skin is burned and the ends are glued together. That's what we'll have.
- We glue the head onto our workpiece from two rounds, onto the smaller one.
- Other skins can also be cut at length. The paws are shaking like the head. Glue to the bottom circle.
- Another option is a small bob and a timid ponytail.
- The rest of the mixture is folded in half and using an additional knife, the edges are rounded. Unfold and glue to the back of the lower stake and use scissors to twist them forward. Bunny is ready!
Video on how to get a bunny from a paper for 5 rubles
Garna kvitka
To decorate your interior, you can make your own custom paper note paper. For which you don’t need special skills, children from 4-7 years can help with witchcraft. To login, we have created a report for you with step-by-step instructions. 
You will need:
- Paper for notes
- PVA glue
- Cardboard
- Knifes
Robot head:
- The paper for notes is better than vikorystuvat without a sticky edge. Take the sheet in a burnt piece and fold the rolls side by side. Glue them together. Little balls come out. So use all the leaves.
- Make the cardboard about 7-8 cm thick. So we end up with a small square.
- Now glue 1 row of pellets onto the stake with the short side facing up. The pellets are at fault, one after another.
- On the next row, glue the pellets at the gap of the previous row.
- So timidly the rows step by step, changing the number of pellets in the row.
- The middle is filled with pellets, no longer oriented to the rows, so it’s beautiful and voluminous. The flowerpot is ready, you can hang it on the wall or put it on the table.
Do-it-yourself video card
DIY book
If you want to create an unexpected skill, since you are still in a position to use it for research, you can create a small origami book using paper. You won’t be able to write down your accomplishments and creations with her, otherwise you won’t be able to make other notes, until then you won’t have a lot of space. It is very easy to create such a virus, just follow the instructions with a step-by-step description. 
You will need:
- Arkoush paper A4 - 2 pcs, carved color
- Knifes
Robot head:
- Arkush A4 should be folded in half. Open the sheet back.
- Then fold the side sides to the central fold.
- Once you have finished, cut the sheet into 4 slices.
- Take one sour cream and fold it 3 times. You seem to have a small straight cutter.
- So try it out with all your smiles.
- Open the trikutnik, which is the highest, and now fold it into an accordion. Also work with a sieve.
- Now glue all the parts, folding the remaining sides one on top of the skin accordion.
- Using hot glue, fold the sides together so that they fit one on top of the other and glue them together. This method works well for us.
- An A4 sheet of a different color is folded across the width, and then downwards. You have 4 straight cutters. Choose one of them.
- For the straight cutter, fold the two sides to the center, but not reaching the center by about 0.5 cm.
- Rectocutnik is folded in bulk and a little is called a cent. Now focusing on the center, make two folds in the central part with a width of about 0.5 cm. The facing is ready.
- Now the fitting arches are sewn onto the facing, bend the middle according to the size of the arches. Then insert the remaining sides of the stitching into the facing. For quick fastening, you can quickly apply glue. Our casual notebook is ready.
Video on how to make a book with your own hands
Snowstorms for decoration
Meteliks from paper can be used as decoration for walls, windows and gift packaging. The smells create a romantic and light mood, even snowstorms are so graceful. You can make snowstorms with your own hands, whether you are a child starting from 3 years old or just a cob. There are a lot of options for choosing snowstorms from the paper and we would like to tell you one of them, finish the coffee. Now let’s create with our own hands a wonderful beauty in the appearance of a snowstorm. 
You will need:
- Arkush paper A4 - 2 pieces (zhovtiy and rozheviy)
- The head is big
- Namistinki and beads
- Thin drit
- Knifes
- Scotch tape
Robot head:
- We take one sheet and fold it all over, but you don’t need to see any folds.
- The cut is cut, with more on the bottom side and less on the top side with a smooth ridge in the middle.
- We open the sheet and crumble along the fold line, folding it like an accordion. We chopped up the upper porch.
- For the bottom one, you just need to make little bundles of the same size. Then we fold it like an accordion.
- Use your bare tongue to push through the wings of the snowflakes at the center, so that it is easier to scrape them apart.
- The drite is folded and strung onto a new circle.
- A white bead is placed on the edges of the upper wings, on the offending fibers. Then two gold pieces for the skin.
- The reshtu drota is decorated with golden beads. To finish the sauce, we need to insert the end of the shot into the remaining beads twice. The application is being rejected. Also shy with a different taste.
- The upper and lower wings creak at the same time using additional tape.
- On the lower part of the chest we put white tins of a larger size, about 4 pieces, and then 2 more tins of a smaller size.
- You need to finish the ponytail as well as the hair, but to be on the safe side, you can make a bunch of curls that you can twist and wait.
- Now spread out the winged snowflake and you can decorate the interior.
Yalinka origami from paper
To decorate your home, office, or kindergarten to a new age, you can make a tsikava and an unusual scrapbook with paper with your own hands. For those who love origami, this Yalinka is well suited. To sign up for this virus, please read the step-by-step instructions, as well as the photo and video description. 
You will need:
- Color paper
- Knifes
Robot head:
- 3 sheets of green robimo paper square.
- Join the two prostrate kuti so that you have a superior trikuti.
- We unroll the trikutnik back from the square and fold the other two protruding kutas into a trikutnik.
- Along the folds of both sides, fold them in the middle if you fold the trikutnik out.
- Now the sides of the tricube are folded to the center, the head on one side, and then on the other. I’ll call you back.
- The skin of the trikuti is straightened along the fold, straightened along the central fold and folded and a new fold is made on the left side.
- Divide the resulting structure on equal sides.
- Bend the lower bundles uphill, and then knit the middle.
- Our workpiece seems to be similar to a yalinka. There are three cuts on all sides of the piece, not reaching the center.
- Now we need to bend the cut at the inner side of the skin. In this way we will get little bits of yalinka. We are concluding this work with all sides of the link.
- Yalinka is ready to decorate her little booth.
Chamomiles for paper
If you want to bring a summery and sleepy mood to your interior, make daisies from paper with your own hands. They can be admired not only in the interior, but also as a gift to family and friends. Such flowers and beautiful daisies will not deprive anyone of their lives.