Engraving on metal always attracts the eye. This business has been going on since a long time ago. And in our day, it has not lost its relevance. Folk craftsmen can transform everyday objects into real creations of high art, decorating them with chimerical miniatures. Sometimes you can find paintings of significant dimensions, created by engraving artists. And few people know that it is absolutely possible to engage in this right thing.
Photo 1. Souvenir engraving of Myslyovsky Nizh, an ideal gift that can be given to Myslyovians.
Do-it-yourself engraving can be a profitable and profitable business, whatever you want.
You can decorate small metal objects with engraving with your own hands at home. It’s all about keeping friends and acquaintances busy. In Chrysostom, thousands of masters practice this craft at home. Decorated engraved speeches are expensive. Shablya - approximately 300 thousand rubles, Myslivsky Nizh - up to 100 thousand (photo No. 1). Wait a minute, these are good pennies. How to make engraving on metal at home with your own hands? For this activity, you need to prepare the simplest equipment you can find in any house or apartment.
Let's start experimenting
Decorative designs are applied with engraving on plates, knives, pistols, templates, medals, cups, apartment numbers. All prints and writings are saved permanently and do not require the use of expensive or rare materials or special possessions. Malyunok can be applied to steel, aluminum, brass, copper, metal alloys. The method does not bother Dovkill. It is impossible to erase the little ones in the most extreme ways and in some special way.

Photo 2. Engraved rings, the date of marriage and the initials of the bride and groom are written on them.
- Nail polish, which the troops no longer need.
- Toothpick with sharp ends.
- You might need some extra cheesecake.
- Kitchen salt.
- Car battery charger. This can be successfully replaced with a mobile phone charger.
- Curses or porcelain dishes in the form of flasks, kitchenware or jars.
- A home for removing varnish.
The work is carried out in this order:
- Take a spoon and cover it with nail polish. The entire surface needs to be carefully treated with varnish, otherwise the robot will fail.
- With a cheesecake or a toothpick, apply a ball of varnish to the top, names, and other images.
- I’ll put a bottle or 2 tablespoons of salt into a jar. They pour a spoonful of salt and a spoonful of soda.
- Water is poured into the vessel and thoroughly stirred until mixed.
- A car or other charging device is connected with the plus side to the device that is being formed, and the minus side is connected to any metal object that will be placed in a vessel with water. This object could be another spoon, a piece of thick wood, or a metal plate.
- Turn on the viper at the edge. An etching reaction due to darkening in the background may soon begin to appear in the bottle. Try 1-5 hvilins. This should be stored in the size of the stream. The virus is periodically checked. After reaching the required depth, the etching is removed from the container.
- The varnish is washed with water to remove the varnish. The result may look something like this (photo No. 3).

Photo 3. Personalized engraved spoons and other engraving can be done on various metal objects at home.
Using this method, you can process any metal objects in your home. If you varnish the writing, it will be puffy on the wiped aphid. For accurate work, it is recommended to add a special tool - an engraver. They can be used with electrical circuits and with supplied batteries. The set will have storms of different shapes. They can be used for shingles, plastics and other materials. Gravity hoops are a wonderful gift for young people (photo No. 2). However, you can only work independently if you are completely satisfied with the results of the work.
Turn around to the spot
Gravity bath on the rock

Photo 4. For home gravure you will need, first of all, nail polish, a polish cleaner and a bottle of water.
Do-it-yourself engraving on the glass surface is engraved using chemical and mechanical methods. The mechanical method transfers the vibrating nozzle, which is driven by an electric motor. Procedure:
- The marker of the dark color of the little ones is transferred to the side.
- Apply the sponge to the image on the scalp. You need to be careful so as not to stain the little ones.
- During the hour of work it is necessary to remove dry eyepieces.
- After the birth, rinse the baby and check to see if any overflow is detected. For missed meals you will be charged again.
Photos about how to make easy engraving on a knife blade. A welcome gift for your friend, girlfriend, mother, grandmother or sister.
We take the lower one. We clean the water and other liquids with a varnish remover.
We remove the spitting photoresist from the police (you need to first place it on the police) and create the tape we need.
The photoresist has a thin coating on both sides. We remove the spittle from one side (I glued the tape to the edge).
I glue it carefully on the bottom. There is great calm and respect here. It’s not easy to kill a hangover, because the photoresist must lie down evenly and without any bumps. (I’m too short to speak)
We take spittle for use on a laser printer (I don’t know where to buy from my place, I had to buy it through an online store) and other things that are good for your soul, not even thin lines. I've been wondering for a long time what I can write on a kitchen knife and get a surprise from my friends. Come home from work, take a knife, cut the bread and it’s healthy (I promise)! My printer is old, so the toner has slightly muddied the fluid, but in principle there is nothing terrible.
Everything on the right is illuminated under a UV lamp. I bought it at 5W, so I saw about 10 hvilins at a close distance, since the lamp was getting darker, I needed to experiment with it every now and then.
While the bottom starts to light up, prepare the soda ash mixture. You can buy from Gospodarsky, the best soda for drinking. I poured a teaspoon of bitters into a half-liter jar. We mix all this bad stuff until it is completely disorganized.
After 10 minutes, the bottom is removed. We remove the top layer from the photoresist (also using tape) and wonder what came out of us. The photoresist will darken and the writing will be clearly visible. If the writing is not visible, then there are two reasons, because it was not illuminated enough, as a result of which the entire photoresist was destroyed, because the stretched lines were too thin (not black enough) and the entire photoresist was illuminated.
We break down the photoresist so that it does not light up using soda. I swung a knife and rubbed a few bits with my finger. Do not press too hard on the bunt.
The results of chem. If the reaction is not illuminated, the photoresist is completely destroyed. Re-construct it until it has broken down to metal... Wash it with water and blot it dry with a towel.
In case of any damage, we cover the edges with varnish.
We steal plasticine from a child (in a store) and glue it along the contour. Glue the plasticine carefully so that there are no tears.
Fill with rosemary salted water (I added a teaspoon to 200 grams). We take an unnecessary power supply unit (I used 12v 1.5A, there is definitely no need for anything else), and connect the + minus terminal to the bottom with water. Don’t keep the smut for long (-) near the water. They moved it for 5-7 seconds and removed the terminal. They repeated it 3-4 times, replaced it with salt water, and were amazed at what came out.
The writing on the metal may or may not turn black. This is what happened to me. So that I wouldn’t just write “let’s fart”, but after fussing over the color, I’d pour a couple of drops of chlorine in here. (Already without electricity, of course).
We remove the plasticine, wash it, wipe it. Excess photoresist is removed by the same retailer. Vlasna, what the hell is wrong with you!
Engraving skills, which can be used to successfully carry out various technological operations, are today actively pursued by both fahivs and home masters. Wanting to add such a device to the current market without creating everyday problems, many of those who would like to have their own machine equipped, do it differently and prepare an engraver with their own hands.
Regardless of the simplicity of the design, the self-propelled engraving machine allows you to successfully perform the same technological operations as a serial model engraver. Before such operations, zocrema, there is a delay:
- milling of flat and shaped surfaces, as well as openings and grooves of different configurations;
- drilling and boring of small-diameter openings;
- cutting of thin sheet material;
- cleaning the virus from traces of corrosion and other persistent contamination;
- application of inscriptions and marks to the marked surface;
- grinding and polishing.

The materials that the self-powered electric engraver uses include metal, wood, plastic, ceramics, glass, brush, piece and natural stone.
What is needed
The functionality, reliability and technical characteristics of an engraving machine itself depend entirely on the materials and mechanisms used for its production.

To create the simplest, yet simplest and most functional engraver, you will need the following accessories.
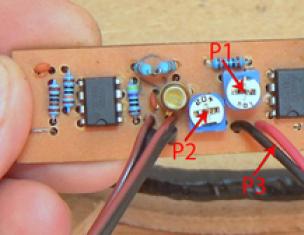
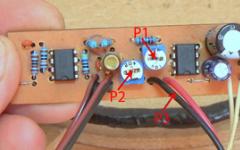
- The bending shaft and working attachment to the new one, in the clamping mechanism of which there is a fixing tool. As a flexible shaft for an engraver, you can use the drive shaft of a drill or a cable to drive the speedometer of a car or motorcycle. The working attachment can be removed from the drill or prepared independently from a block of textolite, grinding it to the required diameter and drilling an opening in the inner part of the step parts. The diameter of the opening in the working head of the engraver must be selected in such a way that its walls reliably adhere to the intact part of the drive cable, and at the same time do not interfere with the wrapping of its loose core. A tube is inserted into the hole at the front part of such a self-contained working nozzle, in the middle of which is wrapped a clamping cartridge made of two halves that are screwed together with a screw. In a chuck that has flexible balancing, you can install a tool with a shank diameter in the range of 2-5 mm.
- A set of tools, which will be followed by cutting. Just like a working attachment for a self-made engraver, you vikorist the handle from a drill, then the tools are used from dental equipment that fit to it according to the diameter of the shanks. For a self-propelled working attachment, as was said above, go for any tool with a shank diameter of 2 to 5 mm.
- A driving electric motor, in the frame of which you can vikorize any motor that operates as an electric current of 220 volts. It could be a motor from a DVD player, or an old CT tape recorder, a washing machine, or any other used equipment that is not subject to vikory repair. The optimal choice for a self-made engraver is an electric motor from a sewing machine, since it is equipped with a rheostat, which allows you to regulate the speed of the wrapping shaft over a wide range. Such engines, as a rule, develop a shaft wrapping speed of up to 6 thousand. r/w, which is entirely sufficient for a stone engraver.


Frame Housing Bracket and clamp
Bushing and coil Utrimuvac Electric motor switching diagram
To make an engraver, you also need electric drills, a sharpening bench and a standard set of metalworking tools.
The principle of a self-robot engraving machine
The self-propelled engraver of the designed design follows this principle. The winding from the electric motor, through pulleys and a gum belt, is transferred to a rotating shaft, which, in turn, drives the working attachment and fixes it to the tool.
A do-it-yourself engraving machine can be made in another design, which transmits that the rotary shaft is connected to the electric motor behind the help of an adapter coupling. At one end, such a coupling is mounted on the shaft of the electric motor and is securely fixed to the new one with the help of a pin, and a ring on the core of the bent shaft is inserted into the square hole on the other end.

Once all the structural elements of the upcoming self-made engraver have been prepared, we begin to prepare it.
- For reliable and stable fastening of all structural elements of the engraver, it is necessary to create a simple base frame, for which you can twist a sheet of textolite or thick plywood, cut from a piece of the required size ru. At the rear of the marked places on the surface of such a base, an electric motor and a bracket with a clamp are attached, in which the rear tip of the bend shaft is fixed. After tightening the fastening nut on the bracket clamp, the end of the bend shaft must be firmly fixed.
- After preparation, pulleys, which can also be taken from old everyday equipment, are fixed on the shaft of the electric motor and on the rotating core of the rotary shaft. To achieve this fixation, it is necessary to drill holes in the flange part of the pulleys and on the shafts, where pins will then be inserted. To ensure the reliability of the connection, use a primary epoxy resin. The transmission of the winding from the electric motor to the bevel shaft, which operates behind the help of pulleys and bevels, is manual because, by changing the diameters of the pulleys that are rotated, it is possible to regulate the frequency of the wrapping, so that informs the grower.
- The final stages of preparing an engraver of the designed design include installing a gum bezel on the pulleys of the rotary shaft and electric motor, connecting the motor to the electrical supply, fixing the working attachment with the tool at the front end of the rotary shaft I have a test room ready for construction.
To make your engraver safe in operation, prepare a compact casing for its electric motor and belt drive (you can use original plywood). The remaining parts of the hand when working with the device are occupied by the wiped-out machine, which is formed, and the working attachment, you can equip the engraver with a foot pedal for its activation and deactivation. The main element of such a pedal, the body of which is often made of plywood, is the primary button.
As a drive for an engraver, you can use an angle grinder with a “flying” gearbox.
Most likely, it is better to choose drive elements from dental drills to equip your self-made engraver. It is recommended to work for the same reason that such shafts should be removed from old drills, already equipped with working attachments with clamping collet-type mechanisms, in which the instrument is easily and reliably fixed, so Vikorist.
Nowadays, the bendy shaft of a dental drill is used as a driving element of the engraver attachment and is completely inoperable. The problem lies in the fact that for dental attachments it will no longer be possible to select the tools necessary for working on a gravel unit. This problem is simple to solve: a lot of tools for the engraver can be prepared independently, using materials at hand.

Thousands of years ago, humanity mastered the ability to cut metal on metal. The method is priming, which involves removing the top ball from the surface of the surface using hand-made methods. With the emergence of metal in people's lives, there was a need to master a new craft - engraving.
The latest equipment and technological process make it possible to create garnishes and unique expressions. The desktop method transfers the work to the robot in automatic mode, which significantly saves an hour. For home-made work, you need to master the methods of artistic painting. The transferred baby can be cut with a laser or a special machine.
Main types of engraving on metal
The craft under the name of engraving has appeared a lot of times. Objects and decorations, carvings and individual engravings are passed down through generations. Engraving on metal allows you to give the product an individual look and uniqueness. In fact, there are a number of types of gravel.
Hand engraving turned out to be the first, it may drink with the crowning of jewelry embellishments to this day. Parts that touch an uneven surface are practically impossible to machine. The application of inscriptions on rings and other embellishments is done mainly by hand. The tool used for this work is a chisel, a small chisel with a sharpened end. Manual engraving creates an attractive, modern look and adds polish. The disadvantages of this method include the high price, and the successful work will require the necessary professional skills and expertise.
With the mechanical method, a special workbench is used, and a specialized milling tool is used to remove a part of the upper ball from the surface of the machine. The simplicity of the robot, as well as its low power, made this method the most practical. The surface must be as equal as possible and consistent with the dimensions of the frame when equipped. Movable materials are processed using diamond-filled tools.
Laser engraving on metal is a new way of processing viruses. The fluidity of the robot and the availability of technology have created the most complex method. Virib accepts the necessary baby or written with a path for laser engraving .
This type has a number of disadvantages, one of them is those that are written or small ones are quickly erased from the product. On jewelry, laser engraving looks aesthetically pleasing, the quality of the work lies in the tool and qualifications of the master.
Zagalna technology
Various types of gravel-washing processes share a wide range of technologies. The main methods are manual and mechanical, remaining divided into the categories of defense and line.
- A bulky little one can be trimmed with a path of stagnation of a defensive gravel bath, a deeper treatment transfers a trivial gravel bath.
- When finishing surface processes, the shading technique becomes stuck. The process is carried out in a few strokes, lines are applied to the contour of the cut, and a piece of metal is removed from the surface using line strokes.
Blackening can be removed without the need for special equipment. The mixture is mixed with potassium carbonate and syrup, the proportions are adjusted to one to two. It is necessary to place the sum of materials in a large container in a manual container, the process must be carefully controlled and the warehouse must be mixed. After the warehouse has been fermented, the fire becomes dry and the mixture is ground in the mortar. The blackening process is carried out in a number of steps:
- The warehouse is mixed with water at the joint one to 9.
- The special container contains the item for preparation before finishing the action.
- The heated part is heated until blackening occurs, the material is subject to the necessary tinting.
Before applying the paint, it is necessary to work out the surface, such accidents do not remove the varnish. Engraving on metal can be done with different colors, adding special words. Add zinc chloride and copper sulfate to a dark brown color, mixing with 1 to 1 water. A series of shades can be obtained with a mixture of 2 g. Potash and brine, especially kitchen salt, up to a liter of water. The amount of potassium sulphide in fresh grams is up to 250 grams. water, give the virob a red wine.
After completion of the activity, the varnish comes off. It is based on black technology, a process that is not similar to black when engraving on metal. The process can only be accomplished using mechanical methods, but it is impossible to do with handy objects.
Gravity methods at home
The process of metal engraving can be completed in a number of different ways. All possible options require the necessary tools and skills.
Laser engraving, which operates on metal, requires obvious knowledge. With small obligations, spending on the purchase of property can be unpleasant. Laser engraving allows you to image the smallest details within an hour of work, the little ones look clear, without blemishes. This type is suitable for entrepreneurs whose craft is the main type of income.
Manual cutting will require fewer tools and chemical storage facilities. The high brilliance of the baby can be appreciated only for the obviousness of its singing habits in this area. Tools for work must be well-sharpened and varied in order to perform on a professional level.
Use of a special device for applying small letters and writings
Removing the acidic liquid after the process is completed is the main priority of any master. To work with your own hands, at home, the best option is to use a tool called an engraver. The presence of the impersonality of equipment and devices expands the spectrum of drying and removes the work manually. Mechanical gravel follows technology.
- Before creating a gravel bath, it is necessary to prepare a baby or baby. You can mark the mark with a thin marker or a sharpened pencil, or you can also use a carbon paper.
- It is necessary to use the tool in sufficient light; the work must be carried out in one direction to avoid splinters and nicks.
- After the metal processing is completed, the area of the work is covered with a barless varnish. To consolidate the result, you can apply a viscous wax and apply it with a thin ball onto the vibrator.
The use of a hand engraver or a machine must only be carried out with a special tool. The choice of nozzles on the table is so large that there is a possibility of mixing up the tool, which will result in the installation of the machine.
Apply the baby using a suitable set of materials.
Resulting types of gravel baths in home washes can be eliminated by electrochemical infusion. To get started you will need a set of ingredients that you have at your fingertips.
- The locality corresponds to the size of the virus. The part must fit perfectly, the neck being the widest for manual work. For small viruses, use a faceted flask; the best option is a jar flask.
- Wire for connection with clamps. You can use a butt pin with foil clips, or better yet, use special crocodiles.
- Dzherelo tension. It is sufficient to charge a mobile phone with an output of at least 1 ampere. It is possible to use a charger for a car battery or household appliances with a voltage of up to 12 volts.
- Vikorist is used in the required concentration, per 250 ml of water, approximately 2 teaspoons.
- Nail polish. Gospodar's stores have a substitute - tsapon - varnish. The stock is identical and can also be easily wiped off with acetone or alcohol.
The process is carried out by applying the paint to the metal with a toothpick or nail. After this, a ball of varnish is applied to the surface. The positive wire of the life-jet is applied to the vibrator, the minus wire is lowered to the bottle of water or a metal object. The metal etching clay is deposited during the process. After the etching process is completed, the varnish ball is removed with acetone.
Gravity from a metal object with a drill
The tool works by removing the metal ball from the surface of the machine.
The price of a machine is steep, so for many times the purchase is not worthwhile.
For this method, you will need a set of different attachments. Working with a gravel machine will not take a lot of time for preparation and process. Before working with the metal, protest the surface with basic metal, call to work, and completely screw the structure.
Engraving on metal with viscostan of different finishes
Humanity has tidied up the craft of metal and robots for five thousand years ago. Technologies that are being perfected every day allow various types of work to be carried out.
Laser engraving is created using a paste at the same time. Apply cuts to the material before the process, to the plot that is being chipped. The laser burns the baby or writes it with a way to change the temperature, chemical process. The dismantling is accompanied by the dismantling of the material. Laser engraving is produced in different directions, but the price is very high for the cost of expensive equipment.
Diamond gravel is finished with a milling cutter and special filings and design. Vikonanna conveys four-sided rims that shimmer when you look at the virus under a different cut.
Work with volumetric parts is possible on a milling bench. Installation can be prepared at home, and can also be purchased from specialized stores. Processing of materials with a milling bench is used for serial production and is suitable for souvenir items, key rings and other metal materials.
Engraving on production
The process is not modified as it works at home. Before the action, the object is polished and then oiled. Before preparing for the process, the vibrator is tinted with a silver mortar, which is evenly distributed over the part.
The outlined baby is placed behind a metal head behind glued tracing paper. The little ones and the shadows are drawn as realistically as possible to achieve a clear result.
After the job, the baby is covered with a dry ball of barless varnish or wax. Then the vibrator is wiped dry and polished to remove the shine.
Tools and materials
When using acidic gravel, the trace will be processed to a special machine. Having the right equipment for engraving on metal allows you to create more precise and beautiful work.
The level of preparation and the knowledge of the master play an important role in the process and the final result.
Robots with metal extract the following materials:
- Virib or metal scrap.
- Varnish the surface.
- Virobnich tracing paper.
- An engraver is a tool with a metal bur.
Yak vibrati poladnannya
Your skin type will make the process smoother and brighter. Current technologies make it possible to write different types of letters, write high folding letters on metal.
For example, the use of a special paste on CNC machining machines allows you to engrave ink marks on metal with different contrasts. Clear tools for engraving can be used for embedding small pieces and other ideas on metal.
For clear robotic work, you can add a professional set for manual engraving. Hand tools allow you to fill your hand and learn all the delicate work. After mastering the necessary practice and beginner, you can move on to more complex methods, vikory and specialized skills.
Metal work can only be done with a sharp tool. Equipment must be purchased from special stores with a guarantee of quality. The preparation of instruments at home depends on the choice of reliable materials. The graver and engraver are ideally suited for achieving the desired final result. Dull tools can be vibrated, calcified, and safety precautions must be followed when working with cutting surfaces.
In order to engrave metal with your own hands, there are enough methods and technologies. There are a large number of metals that lend themselves to engraving, making it possible to bring creative ideas into life.
Gravity technology on steel
There are a number of types of steel processing that require mechanical and manual processing. The application technology is expanding into defense and shading technology. The main tool for metal embossing is a gravel. You can buy it in the local store or prepare it at home.
For any kind of attack, you must increase your respect to the camp of the cutting element, sharpen it. Gravity technology is achieved by removing the top ball from the metal directly in front of you.
Features of engraving on hoops
From a long time ago, an important feature of hoops is gravel. The approach to writing and the little one is selected individually, depending on the transfer of the deputy. The most extensive methods are embedding and corrugating methods. The most extensive work has been done manually on jewelry makers. Jewelers are aware of a variety of options for writing text, as well as methods of presentation. The foldability of the work is assessed individually using a skin lock.
A more widespread method is laser engraving. Instead, the top ball is melted into metal and sealed with varnish. It is important to remember that it is practically impossible to store a ready-made product beyond the size of the product; it is necessary to take into account the size and type of product.